How to Convert and Secure Your VHS Tapes
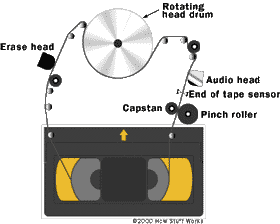
As we get farther and farther away from an event, the images we have of it in our minds become more and more faint. Conversely, as the memory fades, its emotional or nostalgic value goes up and so, preserving any video record of it becomes a fairly important activity. Unfortunately, the medium we used in the past to store video memories - largely VHS tapes - are very susceptible to damage. VHS tapes are magnetic media and since magnetic charge is fundamentally impermanent, the videos stored on tapes will most likely degrade over time. Research indicates that, even if stored properly, VHS tapes can experience 10-20% signal loss after 10 years or more. This doesn't mean that you cannot retrieve and play these videos, but it will affect the quality of the viewing experience. So the sooner you get around to digitizing your videotapes, the more signal you can preserve and the better your experience is likely to be when playing them over.
Converting VHS to digital
Digitizing your VHS tapes begins with a complete inventory of all the tapes in your possession. Once you know how many tapes you are looking at, you can put a plan in place for tackling them. If you have just a handful of tapes, this is not really a mammoth task. However, if you have dozens of tapes stored in a number of boxes across the house, you’re going to want to consolidate your collection and plan for the whole process in a more methodical way
If you're going the DIY route for this project, you’re going to need the right equipment and a significant chunk of time. That’s because your VHS tapes literally have to play out in their entirety while converting their videos to digital formats. If you have a four-hour tape, it will take four hours to transfer the images. So, if you have a box of tapes to digitize, the project could stretch into several hours and span multiple weekends. You also have to factor in the original recording mode of the tape - standard play (SP) long play (LP) or extended play (EP). If in LP or EP mode, the VHS tape is going to take two or three times as long to record versus the standard two or three hours.
The first step in the process is be secure an actual VHS player. This may be a stand-alone VHS unit or a combination VHS/DVD player-recorder. You will also need the right adaptors or cables to transfer the video files from the A/V output of your player and into your computer through its USB input.
The recording part of the process is easy as long as your computer has the right software to convert the incoming signals to a digital recording. The end result is a digital movie format file that you can compress a bit in order to save space, although this may result in some loss of quality.
At this point, you may be tempted to toss your stack of VHS tapes with all the footage that is now transferred and digitized. But it makes sense to hold on to them so that you still have a last resort option for retrieving these videos in case something happens to the digital versions.
Consider using a service
Using professional scanning service for the job is a time-saving (and recommended) option even it means setting aside some budget for the project. A service will have the expertise and experience to deliver the best outcomes for your precious memories. They can also provide a level of manual editing and color correction to ensure that you have a cleanly edited and color stabilized movie file at the end, with blank sections and distracting tracking signals removed.
Storage, backup and retrieval
This is a key aspect of the whole process. Digitization turns your VHS videos into digital files, with MP4, MOV and AVI representing some of the most common digital file formats for movies. Think in terms of local as well as remote (read cloud) backup for these important memories. This is what will keep your videos from the past secure for the future.
Cloud storage is becoming more affordable and there are many providers to choose from, with Google drive, Dropbox and Apple iCloud representing some of the more popular choices. Most offer a free base level subscription that you will probably need to upgrade if you want a home for large movie files. Another option is to upload your movies to Youtube where they are both safe and easily accessed by you and anyone you wish to share the link with.
Another important aspect is the ability to locate and pull out footage from specific events and time periods. This is where file naming, organization and details (in the form of metadata) come in. Check out online forums for tips on the best ways to save and organize your home movie files so that you can easily locate specific sections or images when needed.
The bottom line is that it's not too difficult to salvage and preserve the memories in your VHS tapes. You just need to plan out the process before you begin. There is no reason for wonderful memories to be buried in boxes of tapes. Once you get started, you might be surprised at how well those old home movies of yours convert over to digital and what a fun experience it is to view them with others (even if it means bringing your 80s haircut out in the open).
Value kit as low as $0.34 Per Scan
"Not in a hurry? Have only standard media? Don't need our Pay for What You Want feature? Our Value Kit, starting with 500 scans, is just for you!"
Learn More
How To Articles
- How to Digitize VHS Tapes
- How to Scan Slides and Negatives
- How to Create Striking Photo Displays in Your Home
- How to Transform Digitized Pictures into Unique Photo Gifts
- How to Convert Old Kodachrome Slides to a Digital Format
- Converting 8mm Film to Digital: A History and How-to Guide
- How to Bulk Scan a Large Photo Collection
- How to Convert and Secure Your VHS Tapes
- The 3-Step Approach to Taming and Organizing Your Photo Clutter
- How to Upload Files to Google Drive, Amazon, and Dropbox
- How to Transfer 16mm Film to Digital
- How to Access Thumb Drive Files
- How to Open a Zip File on Windows and Mac


