Don’t make the mistake of scanning photos yourself
Here is a short summary of why:
- It will take a lot of your time (average of 7.5 minute per image)
- It will cost you a lot ($2,500) in equipment and software
- It will require you to become an expert in image processing
You only want to convert to digital your precious photographic memories once and you should do it well. Unless you are willing to commit the necessary time and resources the results will be disappointing. Your memories deserve the best.
Fading & color shift in movie film
Doing photo scanning, slide scanning, or negative scanning by yourself holds the appeal of maintaining perfect control over your images at all times. As people who love photography, we understand that appeal. But there are definitely some costs to doing it yourself, too.
The downside of DIY
Assuming you have the knack for learning technical things, the three main costs of doing scanning yourself (rather than having a service do it) are time, money, and quality.
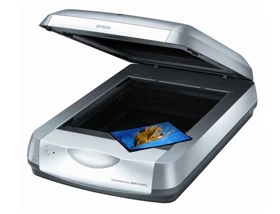
The Epson 4490, our preferred flatbed scanner. Used for scanning photos up to 8"x10".
Scanning takes time
According to research firm GfK North America, the average American adult has 3,000 old analog images. Scanning and repairing those, once you've learned how and bought the equipment, should take about 7.5 minutes per photo. For 3,000 photos, that's 22,500 minutes, or about 375 hours. That's nearly 10 workweeks — or 47 Saturdays at 8 hours a day.
Time Required for Doing Scanning Yourself, Per Image
| STEP | DESCRIPTION | TIME REQUIRED |
|---|---|---|
| 1 | Clean the scanning glass and the images.For a flatbed scanner, clean the glass around every 50 scans. But slides and negatives need to be cleaned individually. | 0.5 mins |
| 2 | Complete the scan. Position the image carefully and complete the scan, preferably at 600 dpi for photos and 2-3000 dpi for slides and negatives. Slides take the longest time to scan. | 1-4 mins |
| 3 | Repair the image. If it's over 10 years old, chances are it needs repair for scratches, fading and color shift. Assuming you've learned the appropriate software already, this should take you 4-7 minutes per photo. | 5.5 mins |
| Total | 7.5 mins+ | |
Scanning takes money
Aside from the time required to learn how to scan, you'll need to buy some additional equipment and software (assuming you already have a PC or Mac).
Upfront Costs to Start Your Scanning Project
| STEP | DESCRIPTION | PRICE (MSRP 3/09) |
|---|---|---|
| Flatbed scanner | For scanning printed photographs up to 8" x 10". We recommend the Epson 4490. While some flatbeds have attachments for scanning negatives and slides, a dedicated film scanner will work much better. | $149 |
| Film scanner | For slides and negatives. These make for the best final images, so you definitely want to scan them if you have them. We prefer the Nikon 9000 ED and the Nikon 5000 ED. | $2,200 |
| Image correction software | While many scanners include image software, we've found that best results come with a full-featured program, like Adobe Photoshop. To save some funds, you could easily use Adobe Photoshop Elements. (But keep in mind, no software can replace the value of a trained human eye.) | $139 |
| Total | $2,488 | |
Scanning deserves high quality
Last but not least, the third problem with doing scanning yourself is insuring that you are going to do it well. It will be a large investment of time and money and you want to be sure that the results are worth the effort. While it's true that buying a good scanner is an important decision, your ability to repair the scanned images for scratching, fading, and color shift is just as important.
Tips for photo scanning and scanning in general
If you still feel that doing it yourself makes the most sense, here are some tips from us that might help with scanning photos:
- Choose a resolution setting. For paper photos, we recommend 600 dpi if you are trying to preserve a memory, and 300 dpi if you just need to display an image on your computer. The higher setting will give you the option to enlarge the photo down the road. (It should create a file that's about 3-5 megabytes in size.)
- Try organizing, but just a bit. It will be handy to spend a little time organizing your photos at a very high level — for example, grouping them by decade. This will prevent total chaos without taking too much time. Then you can organize them in more detail later, using your computer.
- Name your files in a helpful way.Be sure to name your images in a systematic way — e.g., "1960s_Vacations_Disneyland_Bob.jpg" as opposed to "bob27.jpg". Try using your scanner's batch scan mode, in this respect.
- Be sure to clean the scanner glass frequently. At the very least, clean after every 50 scans or so. Use a lint-free cloth to avoid making any marks on the surface.
- Jpg is probably the best output format, for most people. While it's true that jpg's are compressed, as opposed to a file format like TIFF, for most people jpg's will be an acceptable tradeoff between quality and file size. TIFFs can easily take 10 times the amount of space on your computer as jpgs, even for the same image. Professionals, however, will probably prefer TIFFs.
- Disable the Digital ICE feature.This feature is software that attempts to digitally remove small scratches that occur from dust. However, there's a risk it may reduce the sharpness in your scanned image. Instead, it's best to clean each photo by lightly wiping it with a lint-free cloth.
- Try to scan more than one image at a time.This is a great way to increase your productivity. Just be sure to leave about half an inch in between each photo so your scanner can detect that you're scanning two separate images and create two different files for you automatically.
- Watch out for the borders.The borders on the glass scanning surface on your flatbed scanner usually have a corner on the bottom (and on the top) that is unscannable. You might need to try a few test scans to find the area you have to work with.
Tips for slide scanning
- Choose a 3000dpi resolution setting.Slides (and negatives) have much more information on them than a regular photo print, and in many cases a good scan can uncover information in the photo that you couldn't see beforehand. It will also allow prints up to 8" x 12". While scanning at a higher resolution (like 4000 dpi) might be tempting, in our experience scanning at that resolution magnifies too many of the defects in a slide to be worth the trouble.
- Scan the correct side.This is actually harder than it might sound, and it will differ per film scanner. For the Nikon 5000ED, for example, hold the slide up with the image (in the correct orientation) facing you. Then, turn it around by 180 degrees and insert it into the scanner. It might help to orient all the slides in your project this way in advance of scanning them.
- Be leery of automated loader accessories.While it would be tempting to use your film scanner's slide loader accessory to reduce your work, many, in our experience, are prone to jamming.
- Clean the slides. Use dry compressed air to blow away dust and grit. Do not blow on the slides with your own breath (which has too much moisture in it). If compressed air does not seem to be working, you may have mold or crushed dust. In that case, we recommend using a special film cleaner such as Rexton Anti-Static Film Cleaner for Black & White and Color Film. Use a lint-free cloth and wipe gently along the length of the slide. But don't apply the cleaner in a swirling motion, as you will scratch the surface.
- Test the Digital ICE feature.Test your slides with and without Digital ICE, checking for sharpness of the image at a high zoom level. For some images, Digital ICE might "remove" more than just dust and scratches. It may work, but you may also see why we have such an emphasis on scanning by hand, here at ScanCafe.
- Crop your pictures to remove white background before you do the final scan. Use the scanner's preview mode. After the quick preview shows up on your screen, crop the image by drawing a box around the area you want scanned. If you allow any white background into the scan, the scanner's automatic brightness and contrast adjustment will think the white background is part of the picture and will adjust the image quality poorly; the image will be much bigger than it has to be, making the resulting file unwieldy; and the scan will take a lot longer to complete.
- Do use the scanner's film profiles, if it has them.Different kinds of film degrade over time in different ways, and if you tell your scanner what type of film your slides are, it may be able to make systematic adjustments that will save you time. For example, Kodachrome slides were developed using Kodak's special K-14 process (in comparison to the standard E-6 process) and, ideally, need to be handled uniquely.
Value kit as low as $0.34 Per Scan
"Not in a hurry? Have only standard media? Don't need our Pay for What You Want feature? Our Value Kit, starting with 500 scans, is just for you!"
Learn More
Resources
Scantips.com
Wayne Fulton's extensive amateur information site on scanning. visit »Mastering Digital Scanning with Slides, Film and Transparencies
Of all the books published to date, this one, by David Busch, is the one we like the most. But we don't necessarily agree with all the recommendations.look inside the book at amazon.com »
Scanning Negatives and Slides
This book, by Sascha Steinhoff, is slightly more recent than David Busch's above.
look inside the book at amazon.com »
Quick Facts
36%
Percent of Americans who have tried to scan at least one image, as of Oct 2008.
source: GfK North America
Testimonials
It's a timesink just to scan [my photos]."
- L. Bowman (Jan 2009)


