How to Convert 8mm to Digital: A History and How-to Guide
If you are a keeper of family treasures, you likely have more than a few metal canisters filled with 8mm home movies. They may have labels like "Vacation 66" or "Danny's 8th Birthday". Those films are filled with clips that can transport you - to birthdays, reunions or just daily life moments from the past. It would be a pity to let these memories languish in spools of film that you can’t easily play. And so converting your 8mm film to digital is a project that you should tackle at the earliest.
It’s helpful to understand more about the 8mm format and the history of movie transfers before you embark on a project like this.
When we talk about 8mm film, we are talking about the film stock that was widely popular starting in the mid-20th century, among home photographers and amateur filmmakers. Before 1932, Kodak's main film offering for moving pictures was the 16mm format. However, this was an expensive format and not a viable option for the home movie market. And so in 1932, Kodak came out with the more affordable 8mm film format. It proved to be a commercial hit in the decades that followed. Kodak finally discontinued the format in the early 1990s. In the decades following its introduction, millions of people used their home movie cameras to capture memories on 8mm film. Family events such as weddings, anniversaries, birthday parties, and reunions were recorded on thousands of frames wound around a spool. These spools of film were kept in round metal canisters waiting to be displayed by the home movie projector.
If you are a family historian or just love old films, these 8mm masterpieces need to be preserved for future generations. The best way to do that is to convert your 8mm film to a digital format.
Old and new ways to convert 8mm film to digital
Converting old 8mm film to digital is as old as moving pictures themselves. Hollywood pioneered many of the methods still in use today. Here are a few of these:
The Film Chain Transfer
In the 1960s, Hollywood needed to convert films that were decades old into newer formats so that they could be shown on television and re-screened in movie theatres. The most common method for doing this became known as the film chain transfer. With this process, the film gets loaded into a standard movie projector that then projects the images onto a screen. A separate movie camera captures the images and imprints them on the new film stock.
Unfortunately, there are certain critical drawbacks to this method. A flickering appears on the new film image due to the shutter used by the projector to move the old film forward. This method also makes it difficult to adjust color and lighting while transferring the film. The results were less than spectacular, but it did the job.
The Flying Spot Scanner
With the drawbacks of the film chain transfer method, Hollywood started looking for new options. The most popular one was the flying spot scanner. Instead of relying on a sprocket chain and shutters, the flying spot scanner method used a capstan to move the film forward and backward. This solved the flickering image problem. This method also brought in computer processing that allowed adjustments for lighting and color correction as the film was being transferred. It provided a more consistent look to the final product.
The Digital Revolution
By the late 1980s to the early 1990s, the digital revolution had begun. Hollywood was increasingly using digital cameras to capture film images. Film editing moved away from tape decks to computers. Scanners became digital. The final piece to the puzzle was the introduction of the DVD player to the consumer market in 1994.
At first, old 8mm films were transferred to digital formats using interlacing. Video interlacing combines two images into a single one by alternating lines from each one. This helped improve the image when viewed on tube televisions and was a distinct improvement over the old movie projectors. However, with higher definition televisions, the move to a higher definition format was only a matter of time.
Today, preserving old 8mm films to digital is often done in High Definition (HD) format. This results in better quality pictures and higher resolutions than with scans created using interlacing.
How to transfer 8mm films to Digital
Today, the technology for transferring 8mm film to a digital format relies on the methods developed by Hollywood in the past half-century. For those who want to do the job themselves, the film chain transfer method will work, but it still has the downside of flickering and no means of color correction. If you have a movie projector and a camera for capturing the images, you can try this method for yourself. However, you may find the results are not of the quality your home films deserve.
A better option is to have the professionals do the transfer for you. They have the equipment and the expertise to extract the best out of your 8mm films. In many cases, the digital film you end up with may be better than the original. However, not all professional services can deliver such results.
Some professionals still use the flying spot scanner method for transferring 8mm to digital format. While this method avoids the flickering problem, the images may be interlaced and this can show up when you display it on a high definition television or computer. This interlacing will only become more pronounced as technology and resolution requirements advance. Always go with a company that transfers in HD or better quality. This will ensure you get the superior results enabled by frame for frame reproduction.
Other considerations for your 8mm film scanning project
Here are a few other details to help you get the best pictures possible from your 8mm stock:
Full frame scanning: Some companies will crop the image and only capture the inside two-thirds of the frame. With full-frame scanning, you get the entire picture, no cropping.
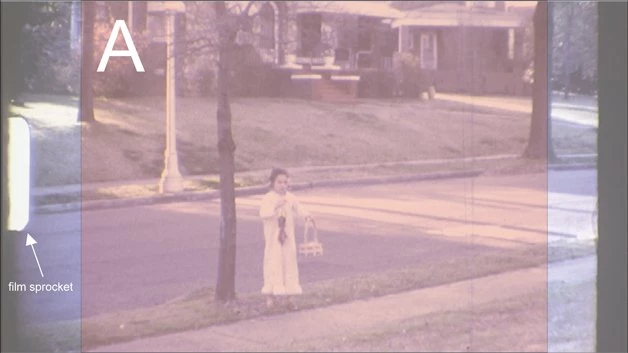
Dust and scratch removal : It is almost guaranteed that some part of the film will have dust and scratches. The scanning company should include dust and scratch removal as part of its service.
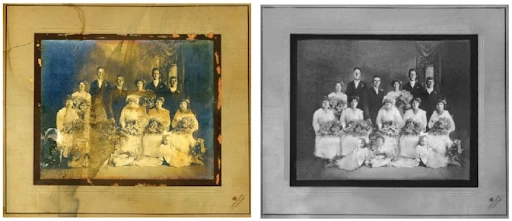
Color correction :Old movies were shot in a different film era when lighting and coloring options were limited. Scene-by-scene color correction helps give the film reel a cohesive look and feel.
Value kit as low as $0.34 $0.17 Per Scan
"Not in a hurry? Have only standard media? Don't need our Pay for What You Want feature? Our Value Kit, starting with 500 scans, is just for you!"
Learn More
How To Articles
- How to Digitize VHS Tapes
- How to Scan Slides and Negatives
- How to Create Striking Photo Displays in Your Home
- How to Transform Digitized Pictures into Unique Photo Gifts
- How to Convert Old Kodachrome Slides to a Digital Format
- Converting 8mm Film to Digital: A History and How-to Guide
- How to Bulk Scan a Large Photo Collection
- How to Convert and Secure Your VHS Tapes
- The 3-Step Approach to Taming and Organizing Your Photo Clutter
- How to Upload Files to Google Drive, Amazon, and Dropbox
- How to Transfer 16mm Film to Digital
- How to Access Thumb Drive Files
- How to Open a Zip File on Windows and Mac


